But firstly, how do we control exposure? Every camera has 3 elements which are used to determine exposure.
1. ISO (or how sensitive the sensor is to light)
2. Aperture (or how much light is let through the lens)
3. Shutter speed (how long the sensor is exposed to light)
Each of these will have an effect on both the exposure, and the "look" of the picture.
Lets start with...
ISO
ISO is a measure of the sensitivity of a photographic film. ISO itself stands for "international standards organisation", which created a guideline for film sensitivities worldwide. Despite being grounded in film technologies, digital cameras have an adjustable ISO. A higher ISO will make the sensor more sensitive to light, almost akin to a volume control on a stereo. Using this example, turning up the ISO in a low light situation is like turning up the volume for a very quiet song.

However, this has a side effect. A higher ISO introduces more digital noise, or "grain" into a picture. Click on the image to the left to see how grain a high ISO has made it.
High ISO also reduces dynamic range (how dark or light the shadows or highlights can be while maintaining detail). A high dynamic range is particularly useful for salvaging shots with computer software if the exposure is wrong, often called "exposure lattitude".
Sometimes shooting with a high ISO is unavoidable, but generaly I like to shoot with the lowest ISO I can for the clearest shots with the most dynamic range.
Aperture
You can think of aperture as "how big is the hole in the lens", or how much light can get through the lens. It's measured in F stops, where a lower F -stop is equivalent to a bigger hole, and a brighter exposure.
So, for example, a picture taken at F8 will be brighter than one taken at F11 if the other settings are the same.
Aperture is very important for one other reason - it controls the depth of field of the picture, or how much of the picture is sharp. A higher F stop will have a larger part of the picture in clear focus.

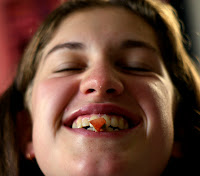
See how most of the image is blurred, and only a small part around her mouth and nose is in sharp focus? That's because this photo was taken at F2, a rather low F stop. This gives some cool creative control over pictures, because now we can direct our viewers eye to a small part of the scene, and abstract everything else in background blur. Or we can increase the F stop, and get a larger part of the scene in clearer focus.
Shutter speed
Finally, we can control exposure by controlling the length of time the sensor is exposed to light. The longer we leave the shutter open, the more light is allowed to fall onto the sensor.
Shutter speed can vary from hours to a 10000th of a second, but typicaly are between 1/2 a second and 1/4000th of a second. A photo is never taken in an instant, only ever over the time the shutter is open. If you're shooting at a 4000th of a second, then you're recording everything that happens in that 4000th of a second. This is pretty neat, because not a lot changes in that type of timeframe. So it's possible to 'freeze' fast moving objects with detail we cannot normaly see, like water droplets splashing.
On the other hand, a longer shutter speed allows thing to move during the exposure. A common use of this is to keep the camera steady on a tripod, and record moving objects as a blur.

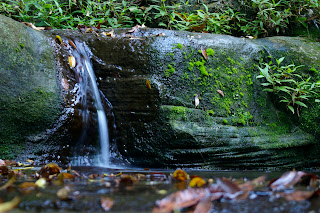
In this photo, the water is trickling while it's surroundings are stationary. With a half second exposure and the camera resting on a rock, the sensor records the stream as a soft blur while it's surroundings (that are in focus) are tack sharp.
One other thing to note about shutter speed is camera shake. Hand holding a camera with a long shutter speed will introduce blur because of the camera moving in your hands. A good rule of thumb is to keep the shutter speed shorter than 1/(the focal length of your lens). So if you were using a 200mm lens, then anything faster than 1/200s should produce motion blur free photographs. At 1/100 s, you would risk introducing extra blur.
STOP!(s)
Ok, now lets put all this into use in a theoretical situation. Suppose using your cameras inbuilt light meter, you know that you will get a good exposure at 1/250 at F8, ISO 200.
However, being the creative genius you are you decide that you want to have a very narrow depth of field to blur out the background, and want to take the picture at F4 instead. No worries, just change that aperture to f4 and take a picture.... what do you know, it's white and washed out. Looks like we over exposed there...
By changing the aperture and keeping all the other settings the same, you've just let more light fall on the sensor and ruined that lovely exposure you had. So what are you going to do? Well this is where understanding "stops" come in.
Note that these are related to the "F stops" that we were measuring the aperture with, but are NOT the same. A stop is simply a relative measure of twice or half the amount of light falling on the sensor.
So if we have our exposure at 1/250 at F8, ISO200 and we were to decrease the shutter speed to 1/500 of a second, then the sensor would be exposed for half as long as before, so we would have decreased the exposure by one "stop". Halve it again to 1/1000th of a second, now we've dropped it 2 stops.
If we increased the ISO to ISO400, then we would have doubled the sensitivity of the sensor, meaning it is now twice as sensitive to light. Hence, we would increase the exposure one stop.
Aperture and F stops
Because aperture is related to the area of a circle (how big the hole is letting the light it) it's numbers work a little differently. Multiplying by the square root of two (around 1.4) gives you an aperture one stop darker.
So some common aperture values,
F1.4 F2 F2.8 F4 F5.6 F8 F11 F16 F22
(each of these is one stop darker than the one preceding it)
Notice that looking at every second number above, the F stop doubles. So, if you double the F stop (for example F8 to F16) then you have actually decreased the exposure 2 stops.
Going back to our original example, if we've gone from F8 to F4 we have actually increased the exposure 2 stops. That explains why that photo was overexposed... So to get an "equivalent exposure" we need to adjust the ISO and shutter speed to cancel out those 2 stops. We can decrease the shutter speed from 1/250th to 1/1000th of a second, which will decrease the exposure 2 stops. The two will cancel each other out, meaning our sensor is receiving exactly as much light as it was with out original exposure.
Understanding exposure can be daunting when just starting out, but its a fundamental tool in photography. Give it a little while and it'll be second nature when you pick up a camera.

No comments:
Post a Comment